Monday, December 30, 2013

Cross-Stitch: Works in Progress


Well, it's December 30.  A new year is almost upon us.  So, it seemed like a good time to take stock of where I am on the various cross-stitch projects that I currently have in process.  I kind of like the idea of having progress pictures all in one place.

My first work in progress is Spring Queen, designed by Nora Corbett of Mirabilia.  My progress is shown in the photo below.  I am stitching her on antique white 32-count Belfast linen, which I just love.  As you can see, she is pretty close to being finished.  I'm currently doing the stitches requiring metallic thread, then I have a little bit more backstitching, and then all that's left is the beading.  This is a design I really need to focus on when I work on it, so I won't go back to this one til after the holidays are over and things are back into a routine.


Here is a picture of what she should look like when she is completely finished.  (Sorry for the terrible photo --I have no idea what happened there!)  Anyway, as you can see, I don't have far to go.


My second work in progress is an out of print design called Liza's Bouquet.  It's by Ginger & Spice.  I am stitching this one on 14-count white Aida fabric, using three strands of floss for really good coverage.  I adore this design, but it is really huge and also has a lot of backstitching, so it will take me awhile to finish.  It is a fun project to work on, though, because it is so colorful and cheery.


Here is a photo of what the finished design will look like.  As you can see, I have the top part of the bouquet done, but have a LOT more to go!


And finally, my last major work in progress is a design by Long Dog Samplers called Tyler's Lion.  Here is my progress on it so far:


And this is what it will look like when it's finished:


Obviously, I have a LONG way to go on this one, but that's okay.  I'm stitching it on hand-dyed 32-count Belfast linen.  The color is called Autumn Field, and it's a great neutral.

So, those are my current three projects.  I am not a "rotational" stitcher (and I didn't even know there was such a thing until recently), but I do like to have more than one project going at a time.  It's not so much that I get bored with one project and need to put it down, it has more to do with how hard I need to concentrate.  With something like the Spring Queen design, which is fairly complex and which I'm doing on linen, I really have to concentrate when I work on it.  There's lots of counting and it's easy to make a mistake.  Sometimes my eyes get tired, and I will pull out Liza's Bouquet, because it's so easy to stitch on Aida.  Also, although there are lots of color changes in this design, there is no confetti and most areas are small blocks of color.  Finally, I started Tyler's Lion because I wanted to do a design that was all one color.  I just love this look, and the added benefit of this is that this is a super easy project to take along somewhere, as all I need are my project, chart, scissors, and a skein of floss.  This is also a good design to work on while watching TV, because although counting is required, the motifs are simple and there are no color changes.

Now that I've shown you where I am on my various projects, I hope to do a post in the next few days with some goals for my stitching (and maybe other hobbies, too) for the upcoming year. 

Saturday, December 28, 2013

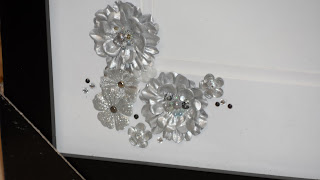
Embellished Wedding Photo Frame


I have remained in touch with one of my younger son's elementary school teachers, a woman named Roxanne.  So when her son got married this summer, I wanted to make a little something for her.  I have done embellished picture frames/mats before as gifts, but I had never done one with a wedding theme.  So I went to Michael's to see what I could find that looked "wedding-ish."  I was pleasantly surprised to find various types of silver flowers along with little black and white adhesive pearls and other adhesive "gemstones."


I selected a simple black frame with two slots for 4x6 photos.  I did this because I wanted Roxanne to be able to use the frame for snapshots from the wedding, and not necessarily for prints that came back from the professional photographer.  In fact, I got the idea to do the frame because of some pictures that Roxanne had posted on Facebook shortly after the wedding -- wonderful snapshots of her and her husband with the new bride and groom, one of her and her hubby dancing at the reception, another with her and her new daughter-in-law goofing around.  The pictures were so great and just expressed the total joy that Roxanne felt that day.

So, to do the embellishing, I just took the mat out of the frame and arranged my goodies in a pleasing manner around two of the corners, then adhered everything using mostly glue dots.  One thing I know about doing these frames is that you need a strong adhesive, because the embellishments will be on a vertical mat (assuming the frame is hung), and that places a lot of extra stress on the embellishments.  They really need to be on there securely!

The top photo shows a close-up of the bottom corner.  I added the date with simple black rub-ons.  I put the date and the embellishments where I did for a specific reason.  I wanted the frame to be useable for photos oriented either vertically or horizontally.  So I kept that in mind while I was designing.

I had a 50% off coupon which I used on the frame, and this gift ended up costing me less than $25.  Plus, I did not use all of the silver goodies so I can use those for another fun project in the future.  The best part is that Roxanne loved it.  She is a wonderful, upbeat, positive person, and in addition, she loves all manner of "bling" so I knew that this would not be too much for her tastes, but you could also tone it down a little for a more streamlined look.

Picture frames are one of my favorite gifts to give for any occasion, but they make an especially great gift for someone that you don't know that well, or when you need something pretty quick but would like something with a bit of a handmade touch.  I am really pleased with the way that this frame turned out!
  

Thursday, December 26, 2013

Cranberry Muffins


Do you have some fresh cranberries lying around that you didn't use over Christmas, and you're wondering what to do with them?  Well, wonder no longer.  Make these muffins!  They are really simple and have a fantastic fresh cranberry flavor.  I took these in to my office a week or so before Christmas, and everyone was raving about them.  When I make them at home, they are gone lickety-split.  Yep, they are that good.  The process is pretty simple.

Measure and mix the dry ingredients in a large bowl, and the wet ingredients in a smaller bowl.


Coarsely chop the raw cranberries, either by hand or using a food processor.  Little hint here -- although the food processor is much faster, I actually prefer to chop the cranberries by hand.  They come out more evenly chopped, and I like the berries to end up in very large pieces.  But, either way is perfectly fine.


Turn the cranberries into a separate bowl, and zest an orange right in the same bowl.


Add half a cup of sugar to the berries and zest, and mix to make sure the sugar coats all of the cranberry pieces.


Now add the small bowl of wet ingredients all at once into the dry ingredients, and mix until the flour is almost all mixed in.  Don't overmix, though, or your muffins will be tough and won't have the right shape. Gently fold in the bowl of sugared cranberries as the last step.


Scoop the batter into muffin cups, filling each about 3/4 full.


Bake in a 400 degree oven for about 20 minutes, until the tops are nicely browned.  Allow to cool and serve with butter.


You could also add some chopped pecans in with the cranberries, if you wanted to.  I often have nuts left over from holiday baking, and I love using them up in recipes like this one.  Oh, I forgot to mention that this recipe calls for buttermilk.  I know it's a "special" thing to buy at the grocery store, but is it so worth it!  I usually buy a pint, and since buttermilk is very lowfat (weird, huh?), it keeps for several weeks.  That's plenty of time to make a second batch of these muffins, thus using up the extra buttermilk!  (Or, I have a great cornbread recipe that also uses buttermilk. Grandma's Cornbread)

Here's the actual recipe:

Cranberry Muffins

2-1/4 cups sifted flour
1/4 cup sugar
3/4 tsp. baking soda
1/4 tsp. salt
1 egg, slightly beaten
1 cup buttermilk
1/4 cup cooking oil
1 cup chopped fresh cranberries
1 tsp. orange zest
1/2 cup sugar

Stir together flour, 1/4 cup sugar, baking soda and salt in large bowl.  Combine egg, buttermilk, and oil in small bowl; stir all at once into flour mixture.  Do not overmix.  Combine cranberries, zest and 1/2 cup sugar; fold into the batter.  Scoop or spoon batter into muffin tins; bake at 400 degrees for about 20 minutes, until tops are golden brown.  Makes about 15 muffins.

I hope you enjoy these as much as my family does!

Sunday, December 1, 2013

Cross-Stitched Pincushion

If there's one thing I just love, it's a gift that is PRACTICAL.  And this one is a double score, because it's practical AND pretty!

I made the pincushion pictured above a few weeks ago as a gift for my sister for her birthday, using a pattern from Blackbird Designs, and 32-count Vintage Maple Sugar linen.  I used over-dyed floss, which has some color variations in it, and I really like the subtle shaded effect that the floss gave this project.

The pincushion took a little lest than 2 days to embroider, and then I got stuck a bit on putting it together.  I couldn't seem to find the type of crocheted edging that I was envisioning, and then I couldn't find the right stuff to fill the pincushion with.  But, eventually I found everything and finished this little pillow up on the sewing machine.

Size-wise, it's about 4 x 5 inches, so it's not a tiny thing.  I gave this to my sister together with a limited edition pair of patterned 4-inch Gingher scissors.  My sister doesn't do embroidery, but she has recently started sewing, so I thought she'd like a small, good-quality pair of scissors to keep by her machine to clip threads and so forth.  And it's nice to have a good pincushion, too.  It helps keep your pins nice and sharp, and I find it so much easier to grab pins from a pincushion than sticking your fingers into a box or cup of pins.

Oh, as a final little bit of loveliness, I stitched my sister's initials into the top right hand corner of the pincushion, and the year in the bottom right hand corner.  I always find that personalization makes a gift just that much more special.