Sunday, February 5, 2012

Sew-Along Project: Sleep Pants (Finishing Up!!)

Woo-hoo!  We're just about at the finish line with our sleep pants!  In this last, finishing-up step, we'll be doing the hems on the legs of the pants.


To get the length right, have the person who will be wearing the sleep pants try them on.  Take a couple of straight pins, fold the hem up, and mark the length that you want the pants to end up.  If you're not sure how long they should be, a good rule of thumb for things like pj pants is that they should come just a bit above the floor at the back leg.  If you mark them at this length, the wearer will have plenty of length over the foot.  Remember, these pants won't shrink since we pre-washed our fabric.  You don't have to mark the whole hem while the pants are on the wearer; just mark that back leg area.


Once you know where you want the final length of your sleep pants to be, you need to cut the bottoms of the legs off exactly 1" below your final length measurement.  That 1" of fabric will be the hem.  You can use your seam gauge to mark all around each leg (with pencil) where your cut line will be.  That unfinished, cut edge will be enclosed in the hem, so it doesn't matter if you use something highly visible, like a red pencil, to mark your line.  Perhaps you're wondering, though, why you need to cut the excess fabric off?  Well, you could leave the length as is and make a deeper hem.  But, unless you're making these for a child and you want to allow some extra length that you can let out in case they grow, I recommend cutting off the extra fabric.  A small hem is easier to do and it's a more professional-looking finish.

So, once your legs have been cut, turn the pants inside out, use your seam gauge and turn up the hem to 1".  Pin all the way around each leg, as shown below:
Now take the pinned hems to the ironing board and press, just like you did when you were making the casing for the elastic.  Press carefully all around each leg, and take the pins out.  Your pants will look like this at this point:
Next step is to tuck the raw edge of each hem underneath, meeting the fold in the fabric and pinning in place, like this:
Keep going, pinning and pressing, all the way around both legs.  Leave a pin in at each seam, just to assist with the sewing.  Your pants will look like this once the entire hem has been pressed into place:

Now you're going to sew the hems.  If you have a free-arm machine, where you can snap a piece off to make a smaller, "floating" sewing bed, this is the perfect use for it.  It is MUCH easier to sew a hem on a narrow pant leg when you can just slip the leg right over the free arm of your machine.  This is something you want to consult your sewing manual for, if you aren't sure how your machine converts to a free-arm.  However, if you don't have a free-arm machine, no worries, just go slowly and make sure that you don't catch another piece of the leg fabric in the machine while you're sewing the hem.


The photo below shows my pants, slipped over the free arm of my machine, as I'm starting to sew the hem.  You want to start your sewing a few inches in front of the inner leg seam (which will be the French seam that we did).  This is because you want the start and finish of the stitching for the hem to not be noticeable.  Note in the photo below that I'm sewing pretty close to the folded hem edge, although you don't need to be right AT the edge like we were when stitching the elastic casing.  The hems are more forgiving.
One thing I want to mention here is that you'll need to coax your presser foot over the seam areas.  This is one of the things I don't like about French seams -- when you're hemming over a French seam, you've got a LOT of bulk once that seam is folded over, then folded over again.  However, your machine can handle it fine.  Just stop as you get close to the seam, keep the needle down, lift the presser foot up and adjust the fabric underneath, then carefully sew over the seam, pushing and pulling just a bit on the fabric until it feeds through the machine.  Always go SLOWLY when you're doing tasks like this, and you'll have great results.


Go ahead and sew the hems in both pant legs, and trim all of your loose threads.  Here's what the finished hems will look like on the outside ...
... and here's how they'll look on the inside:
Here's a close-up of how the stitching will look on the outside -- you can see that my stitching line is just about 1/2" above the bottom of the pant leg.
And that's it!  Once the hems are finished, your sleep pants are DONE!  Here is my older son, modeling his new, finished sleep pants:
What I would love for you to do is take a photo of YOUR finished sleep pants, and post it to the thread that I'll start on TwoPeas NSBR board.  It will be really fun to see what everyone has accomplished, and we can all pat each other on the back!


But seriously, aren't you proud of yourself?  You made a comfortable, durable pair of pj pants that will wear like crazy, won't shrink, and can be washed and dried with no seams raveling or threads coming undone.  You also (hopefully) learned a few new techniques in the process.


The NEXT sew-along project is going to be an apron, so start looking for some pretty, spring-like fabric to make yours, and I'll have an introductory post on that project soon!!

Thursday, January 26, 2012

Sew-Along Project: Sleep Pants (Part 5)

Okay, today we're ready to do the elastic waistband of our sleep pants.  The picture above shows what your pants will look like when the waistband is all finished.  Pretty nice, huh?

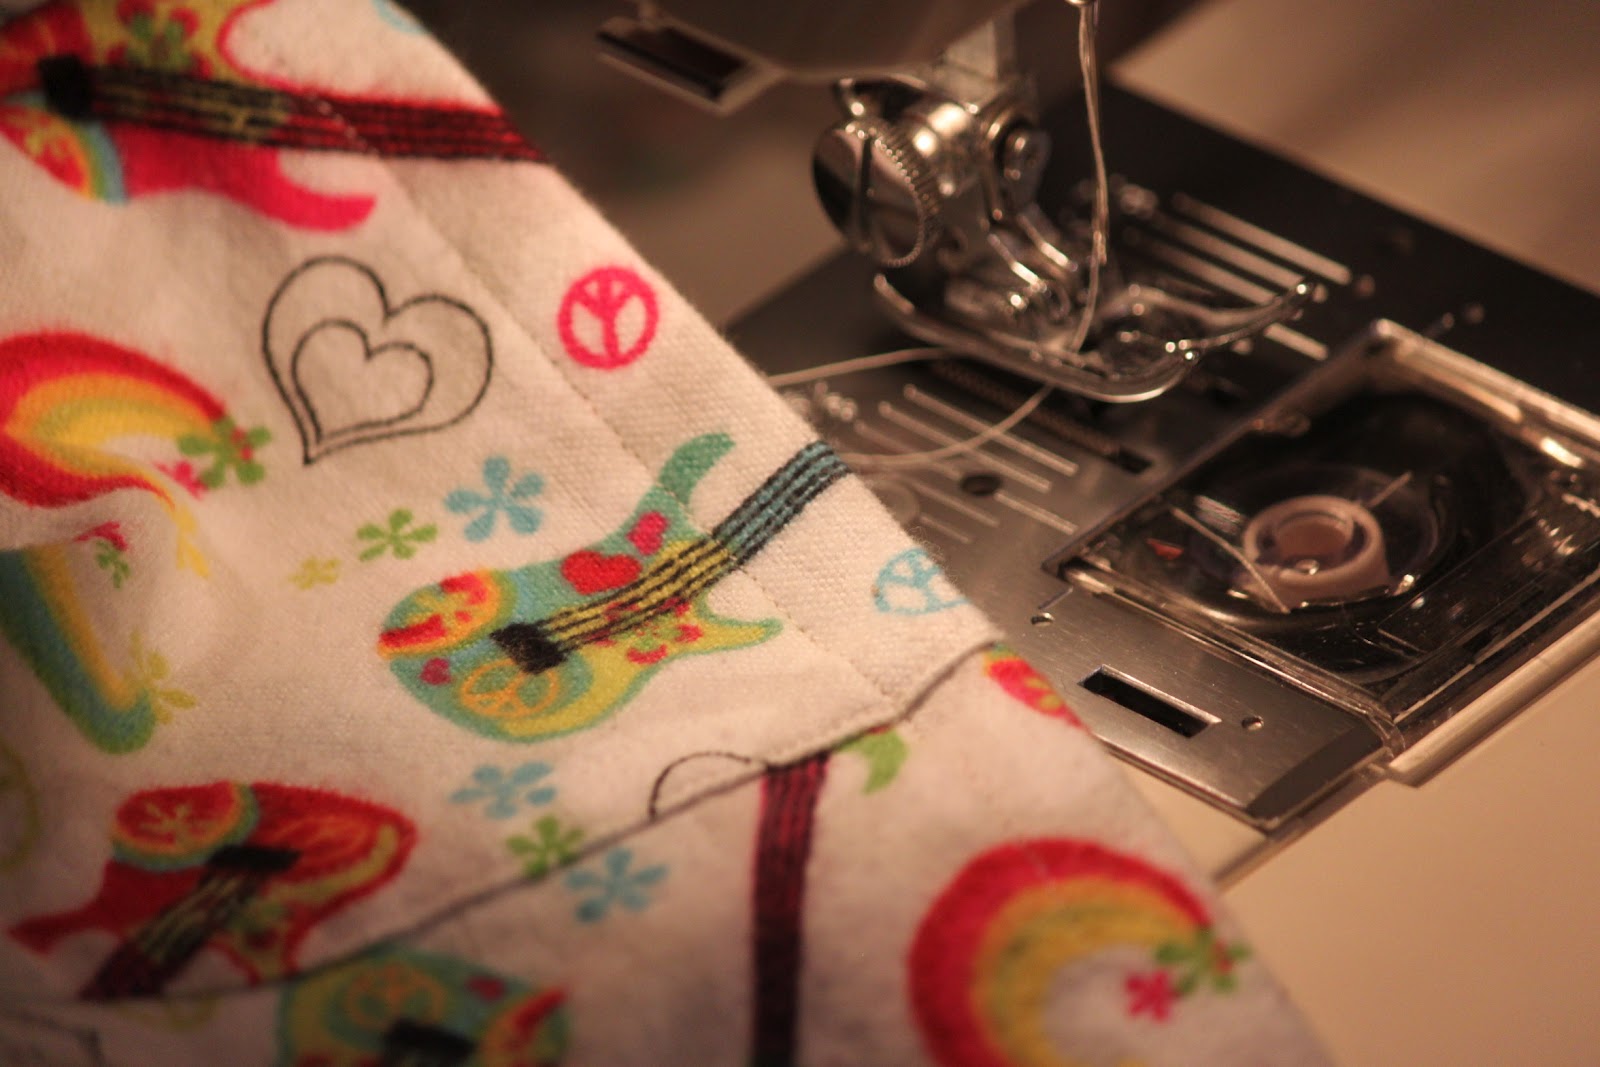
Now, the first thing you need to do is turn under 1/4" all along the edge of the waistband.  If you have one of the seam gauges that I recommended previously, it's the ideal tool to use for this type of measuring.  Just set the red "stopper" at 1/4", then place the edge of the red stopper at the fold of your fabric.  If you don't have a perfect 1/4", refold until you're right on the money.  If you don't have a seam gauge, no worries, you can use a small plastic ruler and do the same thing.  A seam gauge costs less than $1.50 at WalMart, though, so if you're going to continue sewing, it's a good idea to pick one up.
I like to do this step right at the ironing board.  Measure, put a couple of pins in, press, take the pins out, and move on to the next section.  Again, because we're using cotton flannel, the part we're turning over will stay turned over once it's pressed, so you can take the pins out as you go along.  Keep going until you have a 1/4" turned-under edge along the entire edge of your waistband, like this:
 
Now we're going to turn the edge under AGAIN to make the actual casing for our elastic.  The measurement to use here depends on whether you decided to use 1/2" elastic, which the pattern calls for, or 1" elastic, which I recommend.  I think the wider elastic makes the pants look more like a ready-to-wear item, and it makes the waistband more substantial.  If you're using 1/2" elastic, the measurement for your casing is going to be 3/4" and if you're using the 1" elastic, your measurement will be 1-1/4".  You always want to have an extra 1/4" of room in the casing so the elastic can move freely.  So, whichever measurement you're using, follow the same procedure as for the 1/4" edge -- turn under, pin, press, and move to the next section.
For this part, I suggest leaving a few of your pins IN after pressing, rather than taking them all out.  We'll be stitching the casing down, and it's easier to make sure everything is perfect as you're sewing along if you have a few pins in the casing.  Go ahead and turn the edge under the whole way along the waistband, as shown in this photo: 
Now take your pressed casing over to the sewing machine.  You're going to sew right along that fold at the bottom of the casing, as close to the fold as you can possibly get.  BUT you want to START your sewing a few inches to one side of the CENTER BACK seam.  You don't want to start your stitching near the FRONT seam, because it's easier to hide the additional stitching we'll be doing if we start near the BACK seam.

Here's a tip:  as you go along, the presser foot of your machine may seem to "stall" a bit at the seams, because there is a lot of bulk in one area with the flat-felled seams.  If your foot gets stalled, leave your needle down in the fabric, then simply lift up on the presser foot and rearrange the fabric underneath so that it's flat.  Then start sewing again, and ease the foot over the seam, pushing a little on the fabric if you need to. 
Go ahead and keep stitching right next to that fold, going slowing and carefully, but you are NOT going to go the whole way to the end.  We have to leave an opening to insert the elastic, so go the whole way around and stop your stitching 3" or so from where you originally started.  You need to be able to have enough room to manipulate the elastic easily, but you don't want such a big opening that it will be difficult to close later.  Here's what the casing will look like when this part is finished:
Now, for the next step, you're going to have to do some measuring.  Measure the waist of the person who will be wearing the sleep pants, and add one inch to that measurement.  Generally, you want to measure around the person's waist, using a flexible tape measure, and measure at the NARROWEST part of the waist.  HOWEVER, if the wearer likes to wear pjs a little lower than the natural waist, you can take the measurement there.  My 18 year old (like all boys his age, right?) wears his pants fairly low, so I make his sleep pants to fit where he likes the waistband to end up, which is probably closer to his hips than his natural waist!  Anyway, once you have your measurement, cut a piece of your elastic to exactly that length.
In addition to the actual elastic, you'll need something to help you guide it through the casing.  I own the package guides, above, which are very helpful but definitely not necessary.  The old standby, one or two LARGE safety pins, works pretty well and safety pins are something almost everyone has around the house.  If you're using safety pins and the 1" elastic, you'll want to put two pins into one end of your elastic, like this:
If you're using an elastic guide, you can follow the directions on the package, but basically the elastic just feeds through a couple of slots, like this:
The slots have tiny teeth in them, which is what grips the elastic and keeps it secure in the guide as you're going along.  If you decide to use a plastic guide, try to find one that is made for 1" elastic.  The one I'm using, above, is actually only made for 3/4" elastic so I really had to jam my elastic into those slots to get it to fit!!

Now start feeding the length of elastic into the opening in your casing, like this:
By the way, I feed to the left because that feels natural to me since I'm right-handed.  But it really doesn't matter which direction you feed it through.
As you feed the elastic, you're guiding it through by keeping hold of those safety pins or the plastic guide.  You'll have to kind of tug on the waistband a bit to get the elastic to move through the casing.  At first, the elastic will slip in easily, but once you're more than halfway through the casing, you'll get small gathers in the casing, like this:
Small gathers are fine, just keep going.  By the way, another GREAT thing about flat-felled seams is that they are perfectly FLAT when they're inside a casing, so your elastic never gets caught on the seam allowance, as can happen with a plain seam that you've just pressed open.

Keep feeding your elastic through until you come out at the other end of your opening.  BE REALLY CAREFUL NOT TO PULL THE FREE END OF THE ELASTIC INTO THE CASING!!  If you do that, you'll have to start all over, because there will be no way to retrieve it.  So keep a careful eye on the elastic end as you move through.  What you want to do is have a few inches of elastic still on the outside of the casing as your guide comes through, as shown in the picture above.


The reason is that you need to stitch the two ends of the elastic together, and to get the whole thing into your sewing machine, you need some slack in the elastic.  To sew the elastic together, overlap the two free ends, like this:
Put a couple of pins in there to hold the overlap in place:
Then, stitch through both layers of elastic, going over your stitching several times.  What I recommend is sewing a square over the overlapped ends, and going over it several times, making sure to reverse-stitch at the beginning and end.  The idea is that you want this joining to be SUPER STRONG.  Think about it -- elastic takes a lot of abuse, and the constant stretching and releasing will cause a ton of stress on the point where the elastic is joined.
Sewing a square, as shown below, ensures that that sucker is NOT coming out anytime soon!
Now, the next part is a little tricky, but bear with me.  Pull on the waistband of the pants with both hands until your beautiful joined ends slip right inside.  Now we're going to stitch that opening closed.  You COULD stitch it closed by hand if you wanted to, but frankly, stitching it on the machine is much sturdier and it isn't hard, just a bit tricky.  What you want to do is place the beginning of the opening of the casing under the presser foot, and then, with both hands, STRETCH the elastic until the fabric is perfectly flat, like this:
Like I said, it's a bit tricky, but what you need to do is continue to keep the elastic and fabric taut as you sew right along the folded edge of the opening.  Since your opening is only a few inches long, it's not too hard to do.  Remember to reverse stitch at the beginning and end, so that the casing is completely secure.
Now, using both hands, just kind of stretch and tug on the finished waistband of the pants, until the fabric gathers are very evenly distributed around the whole waistband.  This actually takes a minute or two, but it's a really important step for the pants to look right.  This is what you're aiming for:
Now, the next couple of steps are optional, but they are things I highly recommend.  The first is stitching through the elastic along each of the outer leg seams, like this:
Have you ever had elastic in a garment casing twist?  It's almost impossible to get it untwisted, and that's the reason for the stitching at the side seams.  You're stitching your elastic down in two places, thus it will never twist on you!


The other optional thing is sewing a small piece of rick-rack or ribbon at the center back seam.  I just usually use a scrap laying on my sewing table from a previous project.  Again, totally optional.  But, keep in mind that pj pants look pretty much the same from the front and back.  The rick-rack or ribbon lets the wearer see immediately which is the back (just like you use the tag on a ready-made pair of pants).
That's it -- the waistband is finished!!  If everything has gone well, the finished waistband of your pj pants should look like the photo below.  And, assuming you measured correctly, they should fit well.  I've always found the "waist measurement plus 1 inch" to actually be a little bit big, which is fine for sleep pants, that are supposed to be loose fitting.
Now, sit back and admire your handiwork, and I'll be back with the FINAL part of this project in a few days!!


Saturday, January 21, 2012

Sew-Along Project: Sleep Pants (Part 4)

Hopefully, everyone was able to get the flat-felled and French seams done, because today we're moving on, and we're going to sew the two pant legs together into one garment piece.  What we're sewing today is the crotch seam of the pj pants, which is the seam that goes from the center front of the waistband area to the center back.  This is an important seam because it takes a LOT of abuse and gets a lot of wear.


At this point, you have two pant legs, right?  Turn ONE of those pant legs inside out, and leave the other right side out.  Now, lay your two pant legs next to each other on a table or flat surface, with the inner leg seam facing you, like this:
Remember those pins I made you put in, so you could tell the front pieces from the back pieces?  We're going to use those pin identifiers again in this step.  When you lay your pant legs out, they need to be facing the same way.  In other words, if you have the FRONT piece on one leg to the right of that inner leg seam, make you have the FRONT piece of the other leg to the right of the seam, also.  Just look at those pins so you can easily tell that you've got it right.
Now, this might be a little bit confusing, but bear with me and you'll get it.  What you're going to do is, making sure that the inner leg seam of both pieces continues to face you, simply feed the pant leg that is right side out INTO the pant leg that is wrong side out.  The idea is that we're going to line up that crotch seam on the two pieces so that we can sew it.  Here is a photo of the right side out pant leg being fed down into the wrong side out pant leg:  
When you're finished, one leg will be inside of the other, wrong sides of the fabric showing, with that crotch seam all lined up and ready to be pinned together, like this:
 
Now, go ahead and pin that crotch seam together, placing your pins along the INSIDE as the pant legs are facing you.  The next photo shows what I mean by putting the pins along the inside:
Pin the whole way along the seam, and as you go, be careful to match up the notches (there will be one in the front and one in the back), and you also must match the inner leg seams, as well as those "dots" or circles that we marked in red earlier.
Pin very carefully along the curved part of the seam, placing your pins pretty close together:
When you get to the red mark, make sure the center of your mark lines up with the center of the corresponding mark on the facing piece of fabric.  I like to put my pin right through the center of the marking, to ensure that the "dots" are lined up:
The inner leg seam will be a little bit bulky because we have those seam allowances from the French seams that we need to deal with.  The easiest thing to do is to match up the actual seam, then have one of the seam allowances going in one direction, and the other going in the opposite direction.  I usually put TWO pins in at this area, to keep the inner leg seam matched up and so that the seam allowances stay exactly the way I want them to go, like this:
Here's what your crotch seam will look like, once you have the whole thing pinned and ready to sew:
Remember, your pins should be on the underneath side of the seam as the pants are laying there facing you.  If you're not sure what I mean, see how in the next photo, you can see the head of the pins on the UNDER side?  That's how you need to pin this seam.
Now we're going to sew that crotch seam just as we've pinned it, using a standard 5/8" seam allowance.  Be sure to place the fabric in the sewing machine with the pins facing up, like in this photo:
You are going to sew the whole way along this seam, taking out your pins as you go.  Since this seam basically makes a "U" shape, you'll be sewing along some curves, which can be a little bit tricky.  The thing that's tricky is that, because the fabric curves, it can be hard to see that you are maintaining a perfect 5/8" seam allowance.  My best suggestion for sewing curves is to go VERY slowly, and ensure that you're maintaining that 5/8" allowance right by where the needle is going in and out -- don't worry about the fabric a few inches ahead. 
Another thing to remember is that the red mark or "dot" that we made on the fabric is right at the 5/8" seam line.  So, as you sew along, look ahead to your red mark, because if you are sewing a correct 5/8" seam, the needle should go right through the center of your marking, like in the photo below:
 
 As you get to the inner leg seam area, continue to go slowly, and sew right up to the first pin before taking it out, to make sure that the seam allowance from the French seam stays flat and stays to the correct side.  Do the same with the second pin that you used in this area, and just remember to go slow because you're putting quite a bit of bulk through your machine:
 
Now sew the rest of the seam, all the way to the end.  Here's what your finished seam will look like:
Here's a close-up showing you that my seam goes right through the red marking on my fabric:
Now, because this is a crotch seam that takes a lot of stress, we're going to sew a portion of it a second time.  We're going to sew again, BETWEEN THE TWO RED DOTS, making a line of stitching that is approximately 1/4" INSIDE the seam that you already made.  You can follow the 1/2" seam line marking on your machine for this, or you can eyeball it if you're good at that sort of thing.  This extra line of sewing is purely for reinforcement, and not appearance, so if you were to sew slightly more or less than 1/4" away from the first seam, it wouldn't matter.  So go ahead and sew that second line of stitching just inside the first, starting at one red dot and going to the other red dot (remember to take a few reverse stitches at the beginning and end, just as you would with any seam):
Here is what that seam looks like, now that you've done the initial seam and the second line of stitching:
Next, take your scissors and TRIM the seam allowance, BUT trim it ONLY along the portion of the seam that has the two lines of sewing.  Instead of cutting into the seam allowance at a right angle, I usually make a long, smooth angled cut in and then continue to trim between the dots, like this:
So here's how your finished seam will look -- normal, 5/8" seam allowance along the straight part of the front and back, and double-stitched, trimmed seam allowance right along the crotch part of the pants:
Now pull the one pant leg out of the other, so that your pj pants look like this:
Take the pj pants over to the ironing board, and place them over the end so that one of the seams is face up, like this:
What we're going to do is finish the straight, 5/8" seam allowances along the front and back using the flat-felled technique we learned earlier.  The only difference is that we'll be doing the seam finish on the INSIDE of the pants this time, rather than the outside.  So go ahead and trim down one side of the seam allowance ...
... and then fold the edge, press and pin into place, just like you did for the other flat-felled seams that we made.
Repeat with the seam allowance on the other side (and if you're wondering, it really doesn't matter in which direction that you press and pin the seams).  Now take the pj pants back to the machine, and on both the front and the back, sew along that fold all the way until you get to that part of the seam that is doubled stitched and trimmed.  Just end your stitching there, taking a few reverse stitches to secure.  You've now completed the two flat-felled seams.  The only real difference between these seams and the ones we did on the outside of the legs is that we did the flat-felled technique on the INSIDE this time, and we only did it along PART of the seam.  (You can't really make a flat-felled seam along an extreme curve, like this crotch seam, so that's why we did the flat-felled part at the beginning and end, but used the double line of stitching along the curved portion of the seam.)  So, here's what your flat-felled seam looks like from the inside ... 

And here's what it looks like on the OUTSIDE of the pants:
I purposely photographed the part where the stitching stops, so you can see from the outside what it will look like.


That's it -- Part 4 is complete!  Hopefully it went well, but if you have any questions, you can post them here or on the 2Peas message board, as before.  Next step will be the waistband and elastic, so we're in the home stretch!  But until we start that step, definitely be proud of yourself.  Look at your garment -- it actually looks like a pair of pj pants, doesn't it?