
If you've been wanting to learn how to sew, or you know how to make pillows and tote bags but have always been scared of making clothing, I invite you to join my sew-along that I'll be hosting on this blog! Together, we'll be making some fairly simple projects that will nevertheless help you learn sewing basics and some useful techniques. So, welcome to our first sew-along project, which is pajama pants, also called sleep pants.
Above is the pattern that I recommend for this project. It's a McCall's pattern and is suitable for men, teen boys, or women. You don't have to use this pattern, but you should select one that is similar -- a pant that is loose, with an elastic waist, and only two pattern pieces (front and back). One of the reasons I chose pj pants for our first project is that while it's an item of clothing, perfect fit isn't super important. If the pants turn out a little longer or shorter than you thought they'd be, or they are a little baggy, or you make some mistakes in construction as we go along, no big deal. You can still wear them around the house even if they're not perfect!
I'm going to make my sleep pants for this project out of flannel, and you can pick either flannel or just a plain cotton fabric. You want all cotton fabric, or mostly cotton, for this project. When you get the pattern, flip it over and you can find out from the pattern envelope how much fabric to buy for the size you need. If you have trouble figuring it out, someone at the fabric store will surely be glad to help you. TIP: I always buy a little extra fabric, just in case. You don't have to do this, but I highly recommend it, especially if you've never laid out pattern pieces on fabric before. I like to get about 1/2 yard extra, if possible.
In addition to the pattern and your fabric, you'll want to get thread (a neutral color like off white is fine for most sewing) and a package of elastic for the waistband of your pants. The pattern envelope says to get 1/2" elastic, and that's fine, but I prefer to use 1" elastic, simply because it makes the sleep pants look more like ones you'd buy in a store. Either way, find non-roll elastic if you can. Other than those things, you'll need to have the basics at home: pins, scissors for cutting your fabric, a tape measure, and an iron and ironing board. If you hate to iron, join the club, but the truth is that ironing is absolutely essential to sewing. You cannot make a nice looking anything without ironing. The good news is that the ironing is simple.
Okay, you've brought everything home and you're ready to go. The first thing you are going to need to do is WASH and PRESS your fabric. I know, I know. I really hate this part of sewing -- you're all excited about getting started with a project, and you have to do this time consuming and boring part. But, you really need to do it. Flannel and other cotton fabrics shrink, sometimes a lot, and the only way to get a garment with measurements that are close to those on the pattern envelope is to make sure your fabric has shrunk as much as it's going to before you lay out the pattern. So, wash your fabric in warm water, by itself. TIP: It can be a pain to fold your fabric back up after washing, so what I often do is, BEFORE WASHING, pin along the fabric edge with safety pins, pinning the two selvages together. Here is a picture of what I mean:

The selvages of your fabric are the the long edges; usually the fabric manufacturer's name is printed on there, or sometimes they are just plain. So what you're doing is pinning the two open edges together. Now wash and dry your fabric, leaving those safety pins in place. When you take your fabric out of the dryer, it will be kind of a mess, but you need to fold it in half length-wise, the same way it was when it was on the bolt at the store. If you've pinned the selvage edges together, this shouldn't be hard. Now, press your fabric, using the cotton setting on your iron. You want the wrinkles out, and you want a nice smooth surface to lay your pattern on. Put your fabric over the ironing board like this:

Then, press the fabric in small sections, from the selvages to the fold. You can press right over those safety pins as long as you're careful and don't move the iron around when the pin is under the iron. Press the entire length of your fabric until the whole thing is nice and smooth.
Next, find your two pattern pieces and cut them out. If you're using my recommended pattern, the pieces are number 11 and number 12. THE PATTERN WILL HAVE SEVERAL CUTTING LINES ON THE SAME PATTERN PIECE, FOR THE DIFFERENT SIZES. MAKE SURE YOU CUT ON THE CORRECT LINE FOR THE SIZE THAT YOU NEED.
Lay your fabric out on your cutting area with the FOLD of the fabric facing you, like this:

You can definitely damage a table cutting fabric on it, so you want to use an old table or a surface that won't easily scratch. Check the instruction sheet in the pattern envelope for a "layout" of how to place your pattern pieces on your fabric so that they fit. I don't always follow the suggested layout exactly, and that's why I get that extra bit of yardage, so I don't have to worry about having enough. Lay your first pattern piece down as indicated on the layout, and look for a long arrow that says "grainline." In order to follow the "grain" of your fabric, this line has to be parallel to the edge of your fabric. The ONLY way to make sure that the grainline arrow is exactly parallel to the edge of the fabric is to MEASURE. Measure from one end of the grainline to the fold, as I'm doing in this photo:

Place a pin right at that end of the grainline arrow. Now, go down to the OTHER end of the grainline arrow, and measure again from the line to the fold of your fabric. The measurement here must be the same as the measurement at the other end; if it's not, adjust your pattern piece on your fabric until you get the same measurement at the other end of the grainline arrow as you did at the first end. Here, I've got 9" at the second end, the same measurement I had at the first end.

Again, put a pin right on the line, just like you did before. The next two photos show my pins at both ends of the grainline.


I know it seems like I'm spending a lot of time talking about this one tiny thing, but getting the grain straight is REALLY IMPORTANT. Every pattern piece of any garment you make will have a grain line, and you always need to make sure that line is parallel to the edge of your fabric. So get in the habit of measuring and pinning, and your projects will come out right! Oh, I should mention about that holly-patterned tissue paper in the photo above. My son, for whom I'm making these pj pants, is 6'2". I had to lengthen the pattern in order for the pants to be long enough for him. There is a line on the pattern that says "shorten or lengthen here," and I just cut at that line and inserted a piece of tissue paper, lengthening the pattern by about 4 inches. Anyway, you'll see that crazy tissue paper in the next few pictures, so I thought I should explain why my pattern looks like that!
Ok, after the grainline is pinned, smooth out your pattern piece and pin all along the edges. Place a pin every few inches. It's faster to use fewer pins, but frankly, cutting goes a lot easier with more pins. After you have piece number 11 all laid out and pinned down, repeat the same process with piece number 12. Again, be sure to measure and pin at both ends of the grainline.

After you have both pieces laid out on your fabric and completely pinned down, cut around the pattern pieces. Take your time and make sure you are following the cutting line EXACTLY. Remember that you can turn your fabric around to make it easier to cut areas like curves, etc. DO NOT UNPIN the pattern from the fabric! When you're done cutting, you'll have two pieces that look like this:


If you look along the curved edges of your pieces, you'll see a little "circle" on each pattern piece that the instructions will tell you to mark. You want to mark it so that you can identify that spot on the fabric when you are sewing along. I like to mark with a tracing wheel and dressmaker's tracing paper, shown below:

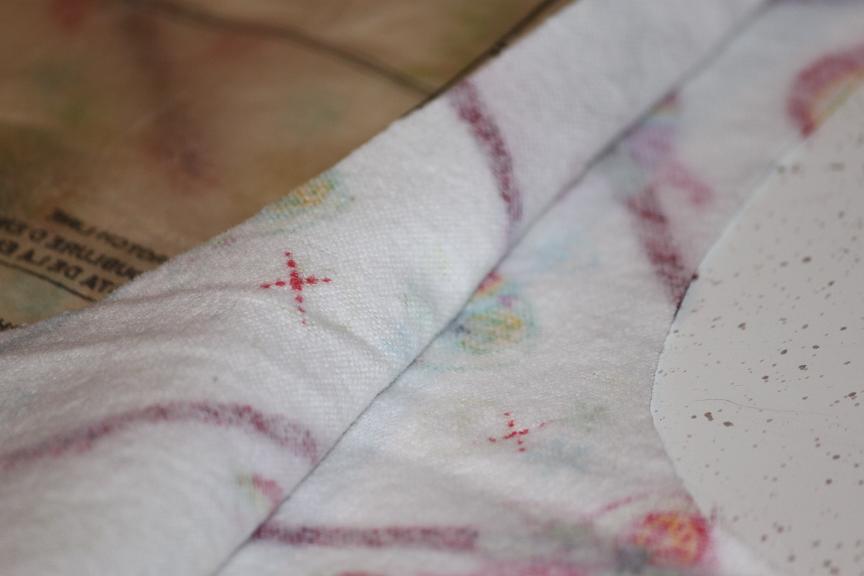
If you don't have these things, don't worry. You only have two little circles to mark on this pattern, so you could just use a pencil if you wanted and make a light mark. You can also mark with something like dressmaker's chalk, which brushes off. The important thing is that you want to mark those dots on the INSIDE of the fabric, so you can see the marks when you're sewing. If you're using the tracing paper, you insert it between your fabric layers (assuming the printed side of your fabric is on the outside) and then just mark an "x" at the circle, using the tracing wheel.

Here is what that "x" looks like after it's marked onto the fabric. I used red tracing paper so the "x" would show up really well. This stuff really doesn't wash out,but most of the mark will get sewn up into the seam and won't be visible. You do NOT need to mark the fold line for the waistband casing (this is indicated on the pattern). We'll just measure to get our waistband fold, when the time comes.
Now, before you unpin your pattern from the fabric, there is one more thing you have to do. You need to find all of the "notches" on the pattern and make a little snip with your scissors at each notch. There will be some single notches, and some double ones. For double ones, make two snips, one at each notch. This is what a snipped double notch looks like:

Be really careful NOT TO SNIP BEYOND THE POINT OF THE NOTCH. If you do, you might end up with a hole in your seam where you snipped. Just make TINY snips, right in the center of each notch. Once that's done (there are only a few notches on each piece), you can unpin the tissue patterns from your fabric. Fold up the pattern pieces because this is the kind of pattern that you can use again and again -- pj pants are a basic, right? Now, one final TIP: I suggest that you put a pin along the waistband edge of each of the two pieces of fabric for the FRONT of the pants. Make sure the pins are secure, like this:

You don't HAVE to do this, but here's the thing. The front and back pieces of a pair of pants look remarkably similar. It just helps the sewing go more smoothly and quickly when you know which piece is the front and which piece is the back.
I'm going to give everyone a couple of days to get this first step completed, and then we'll move on to Part Two! See you soon!


Oh, I love how you are breaking things down into very small baby steps for us. I'm completely new to sewing and can't wait to get started. Hopefully this weekend... Thanks again for doing this!
ReplyDeleteI've been sewing since I was a kid (am now in my 40s). Even made my own prom and wedding gowns. Anyway...I am thrilled to have read your tip about pinning the edges together before washing. That was a *DUH!* moment for me...one that will save me soooooo much time in the future. Why had I never thought to do that?? Thanks!
ReplyDeleteOkay. I can DO this! Your instructions are very clear and I'm already confident that this is a sewing project I can do. I am going today to buy my fabric/pattern. Will post on the NSBR thread when I can. :-)
ReplyDeleteOh, this is such a great idea for a blog post and project. Wonderful!
ReplyDeleteGreat tips and a great post!! :)
ReplyDeleteI want to play! I lost some weight so I need to trace a new pattern. This is perfect inspiration.
ReplyDeleteDoes it matter if I didn't fold it the same way you did? I had my fold at the top of the pants.....
ReplyDeleteIs your fabric right sides together facing in when you pin on your pattern? It looks that way on the pattern directions, but on your blog it looks like you have the right sides of the fabric facing out. Thank you.
ReplyDeleteNo, it doesn't matter if the fold is at the top of your fabric or at the bottom. facing you. Either way, you are measuring from the grainline arrow to the edge of the fabric (either the fold or the selvage edge). Also, it's okay if the fabric can is either right sides out, or right sides in (facing each other) when you cut. It doesn't matter that much. "Fine" fabrics, like really nice dress fabrics, are usually put on the bolt with right sides in, so I would typically leave those that way. Cottons (like my flannel) are often on the bolt right sides out.
ReplyDeleteCan't wait for the next new seam! I may go back and take some material and try the french one on it. It looks fine. No raw edges on either side, but there is just something about it that makes me feel I didn't do it correctly.
ReplyDeleteOuiser/Barbara
I realize I'm late to the party but I'm actually getting ready to start this project ... I'll be using a Burda pattern (a pull-on pants pattern from Burda magazine).
ReplyDelete