Sunday, January 12, 2014

Christmas (Cards) in January


I don't know about you, but every year, I plan to make all of my Christmas cards, and then somehow, I end up not doing it.  But, you know, it's NOT just "somehow" -- there 's a definite reason for this yearly failure.  I have plenty of supplies and plenty of ideas, but what I always run out of is time.  You too, right?

The thing about Christmas for me is that, while I love the whole season, I'm always wary of losing some of that love if I start "doing" Christmas too early.  Making someone something that will be Christmas gift (a rag quilt, for instance) is perfectly fine to do many months ahead, but doing something with an overtly Christmas theme, such as making cards, doesn't feel right until, say, after Thanksgiving.  Kind of like decorating the house doesn't feel right 'til then.

Well, I'm going to try to abandon that mindset this year, because there simply isn't any way that I will ever be able to make even a small number of Christmas cards between Thanksgiving and Christmas.  The only way it will work is if I start making those cards earlier than what "seems right."

So, in that vein, I've already started thinking about Christmas card designs for next Christmas!  I like to make a couple of different versions of a basic design, so I started looking for a simple design that could be adapted in any number of ways, and came across a basic tree design made with different Christmas-y papers.  It occurred to me that not only could this cute little tree could be made out of many different combinations of papers, but the resulting card could also be embellished in a number of different ways.


Above is the first card that I made.  I used a little gold adhesive gemstone on the top of the tree, and the "joy" is a die cut I made using my Quickutz (yes, I still use mine!).  I really love this combination of papers and colors, and the contrast of "joy" done in white.


I like how this one came out, too.  Three different green papers for the body of the tree, and since the background was so simple, I figured I could get away with using a really busy print for the middle part of the tree.  A star brad tops the tree, and the snowflakes were made using a Martha Stewart punch.  (BTW, she has GORGEOUS snowflake punches!!) "Holiday" is a punch-out from some random set I had, but you could use most any type of sticker, or print out a greeting on the computer using a favorite font, too.

And here's the last version that I made.  The tree is embellished with different sizes and colors of star brads, then I used one of the gemstones for the top of the tree.

I"m happy that I've at least gotten a start as to what I want to do for cards this coming year.  I can't promise when I'll get around to actually making them, but I"m going to try to let go of that self-imposed "no activities 'til after Thanksgiving" restriction.  So, I'd love to know -- which version of my card do YOU like best?


Monday, January 6, 2014

WIPocalype 2014 -- First Post!!


Although I don't make New Year's resolutions, I am definitely a goal-oriented person.  And I am also the kind of person that likes to have goals with respect to hobbies.  Not to stress myself out, or to make my hobbies into things that "have" to be done, but simply because, for me, goal-setting works.  I get more done when I've thought about my goals, and written them down, than when I just "wing it.".

That's why WIPocalypse 2014 is perfect for me.  I want to make sure I keep up with my overall goal of cross-stitching more in 2014, so WIPocalype will help me do that.  I love the idea of checking in once a month with progress pictures, and being free to change my list of things I want to work on, or finish, in 2014.


So, without further ado, here is the list of cross-stitch projects that I intend to work on in 2014.  Some of them are current WIPs, but some will be new starts.


1.  Spring Queen by Mirabilia
2.  Liza’s Bouquet by Ginger & Spice
3.  Tyler’s Lion by Long Dog Samplers
4.  Angel of the Morning by Lavender & Lace
5.  Christmas Flourishes by Mirabilia
6.  Apostle’s Creed by My Big Toe Designs
7.  Afternoon Nap (Bucilla kit)
8.  Seasonal Birds (Bucilla kit)
9.  Albero Felice by Alessandra Adelaide
10.  Little Sheep Virtues by Little House Needleworks
11.  “My House” ornaments (Little House Needleworks) for Brandon and Brian
Spring Queen, Liza's Bouquet, and Tyler's Lion are all current WIPs.  I have all of the supplies for Angel of the Morning, Christmas Flourishes, and Apostle's Creed, and I just ordered fabric and pattern for Albero Felice.  For the Little Sheep Virtues, I want to stitch these all on one piece of fabric, so I've ordered the fabric and a couple of the patterns to get myself started.  I have a mini-goal of stitching one of the Little Sheep patterns each month.
That feels really good to get that all written down.  It is a very snowy and ice cold day here in Michigan, so I think I'm going to make myself a nice hot cup of coffee, and sit down and stitch!

Friday, January 3, 2014

One Little Word for 2014


Choosing "one little word" to focus on for the new year has been all the rage for the past few years.  I rather like the idea, because I am not the type of person to make New Year's resolutions -- I don't like making promises to myself that it's likely that I can't fully keep.  But the idea of "one little word" is broader, and I like that.  One idea representing a goal that is important to me, that I've decided to keep in both mind and heart throughout the upcoming year.

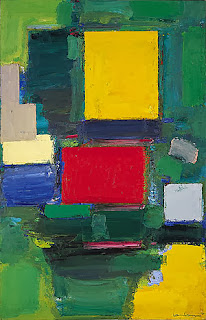
So what's my "one little word" for this year?  Simplify.  As in, try over the course of this year, to simplify my life in ways that are meaningful to me or truly helpful.  Here is a great quote I found from Hans Hoffman:  "The ability to simplify means to eliminate the unnecessary so that the necessary may speak."  Hans Hoffman was a German-born American abstract impressionist painter of the early 20th century.  Here's one of his works:


It's pretty fitting that an abstract artist purposely focused on simplicity in his work, isn't it?  But Hoffman's was not a random focus -- instead, he chose simplicity as a means to help him get to what is necessary, to cut through the riff-raff and find what's important.  I find Hoffman's quote deeply inspirational.

Oh, and that image of Charlie Brown and Linus at the top of the post -- that's another image I am going to keep in mind this year.  I saw the Charlie Brown Christmas special this season for the first time in several years.  I had forgotten how meaningful it really is.  Charlie Brown manages to find the spirit of Christmas in a lonely, forgotten little tree, and Linus, standing under a spotlight on a stage, cuts completely through the commercialism and materialism of Christmas by reciting a few verses from the Biblical Christmas story.  "And that's the true meaning of Christmas, Charlie Brown," Linus concludes.  Yeah, it is.

Simplify.  My "one little word" for 2014.  What's YOUR "one little word"? 

Monday, December 30, 2013

Cross-Stitch: Works in Progress


Well, it's December 30.  A new year is almost upon us.  So, it seemed like a good time to take stock of where I am on the various cross-stitch projects that I currently have in process.  I kind of like the idea of having progress pictures all in one place.

My first work in progress is Spring Queen, designed by Nora Corbett of Mirabilia.  My progress is shown in the photo below.  I am stitching her on antique white 32-count Belfast linen, which I just love.  As you can see, she is pretty close to being finished.  I'm currently doing the stitches requiring metallic thread, then I have a little bit more backstitching, and then all that's left is the beading.  This is a design I really need to focus on when I work on it, so I won't go back to this one til after the holidays are over and things are back into a routine.


Here is a picture of what she should look like when she is completely finished.  (Sorry for the terrible photo --I have no idea what happened there!)  Anyway, as you can see, I don't have far to go.


My second work in progress is an out of print design called Liza's Bouquet.  It's by Ginger & Spice.  I am stitching this one on 14-count white Aida fabric, using three strands of floss for really good coverage.  I adore this design, but it is really huge and also has a lot of backstitching, so it will take me awhile to finish.  It is a fun project to work on, though, because it is so colorful and cheery.


Here is a photo of what the finished design will look like.  As you can see, I have the top part of the bouquet done, but have a LOT more to go!


And finally, my last major work in progress is a design by Long Dog Samplers called Tyler's Lion.  Here is my progress on it so far:


And this is what it will look like when it's finished:


Obviously, I have a LONG way to go on this one, but that's okay.  I'm stitching it on hand-dyed 32-count Belfast linen.  The color is called Autumn Field, and it's a great neutral.

So, those are my current three projects.  I am not a "rotational" stitcher (and I didn't even know there was such a thing until recently), but I do like to have more than one project going at a time.  It's not so much that I get bored with one project and need to put it down, it has more to do with how hard I need to concentrate.  With something like the Spring Queen design, which is fairly complex and which I'm doing on linen, I really have to concentrate when I work on it.  There's lots of counting and it's easy to make a mistake.  Sometimes my eyes get tired, and I will pull out Liza's Bouquet, because it's so easy to stitch on Aida.  Also, although there are lots of color changes in this design, there is no confetti and most areas are small blocks of color.  Finally, I started Tyler's Lion because I wanted to do a design that was all one color.  I just love this look, and the added benefit of this is that this is a super easy project to take along somewhere, as all I need are my project, chart, scissors, and a skein of floss.  This is also a good design to work on while watching TV, because although counting is required, the motifs are simple and there are no color changes.

Now that I've shown you where I am on my various projects, I hope to do a post in the next few days with some goals for my stitching (and maybe other hobbies, too) for the upcoming year. 

Saturday, December 28, 2013

Embellished Wedding Photo Frame


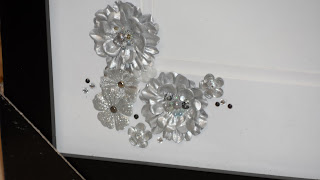
I have remained in touch with one of my younger son's elementary school teachers, a woman named Roxanne.  So when her son got married this summer, I wanted to make a little something for her.  I have done embellished picture frames/mats before as gifts, but I had never done one with a wedding theme.  So I went to Michael's to see what I could find that looked "wedding-ish."  I was pleasantly surprised to find various types of silver flowers along with little black and white adhesive pearls and other adhesive "gemstones."


I selected a simple black frame with two slots for 4x6 photos.  I did this because I wanted Roxanne to be able to use the frame for snapshots from the wedding, and not necessarily for prints that came back from the professional photographer.  In fact, I got the idea to do the frame because of some pictures that Roxanne had posted on Facebook shortly after the wedding -- wonderful snapshots of her and her husband with the new bride and groom, one of her and her hubby dancing at the reception, another with her and her new daughter-in-law goofing around.  The pictures were so great and just expressed the total joy that Roxanne felt that day.

So, to do the embellishing, I just took the mat out of the frame and arranged my goodies in a pleasing manner around two of the corners, then adhered everything using mostly glue dots.  One thing I know about doing these frames is that you need a strong adhesive, because the embellishments will be on a vertical mat (assuming the frame is hung), and that places a lot of extra stress on the embellishments.  They really need to be on there securely!

The top photo shows a close-up of the bottom corner.  I added the date with simple black rub-ons.  I put the date and the embellishments where I did for a specific reason.  I wanted the frame to be useable for photos oriented either vertically or horizontally.  So I kept that in mind while I was designing.

I had a 50% off coupon which I used on the frame, and this gift ended up costing me less than $25.  Plus, I did not use all of the silver goodies so I can use those for another fun project in the future.  The best part is that Roxanne loved it.  She is a wonderful, upbeat, positive person, and in addition, she loves all manner of "bling" so I knew that this would not be too much for her tastes, but you could also tone it down a little for a more streamlined look.

Picture frames are one of my favorite gifts to give for any occasion, but they make an especially great gift for someone that you don't know that well, or when you need something pretty quick but would like something with a bit of a handmade touch.  I am really pleased with the way that this frame turned out!
  

Thursday, December 26, 2013

Cranberry Muffins


Do you have some fresh cranberries lying around that you didn't use over Christmas, and you're wondering what to do with them?  Well, wonder no longer.  Make these muffins!  They are really simple and have a fantastic fresh cranberry flavor.  I took these in to my office a week or so before Christmas, and everyone was raving about them.  When I make them at home, they are gone lickety-split.  Yep, they are that good.  The process is pretty simple.

Measure and mix the dry ingredients in a large bowl, and the wet ingredients in a smaller bowl.


Coarsely chop the raw cranberries, either by hand or using a food processor.  Little hint here -- although the food processor is much faster, I actually prefer to chop the cranberries by hand.  They come out more evenly chopped, and I like the berries to end up in very large pieces.  But, either way is perfectly fine.


Turn the cranberries into a separate bowl, and zest an orange right in the same bowl.


Add half a cup of sugar to the berries and zest, and mix to make sure the sugar coats all of the cranberry pieces.


Now add the small bowl of wet ingredients all at once into the dry ingredients, and mix until the flour is almost all mixed in.  Don't overmix, though, or your muffins will be tough and won't have the right shape. Gently fold in the bowl of sugared cranberries as the last step.


Scoop the batter into muffin cups, filling each about 3/4 full.


Bake in a 400 degree oven for about 20 minutes, until the tops are nicely browned.  Allow to cool and serve with butter.


You could also add some chopped pecans in with the cranberries, if you wanted to.  I often have nuts left over from holiday baking, and I love using them up in recipes like this one.  Oh, I forgot to mention that this recipe calls for buttermilk.  I know it's a "special" thing to buy at the grocery store, but is it so worth it!  I usually buy a pint, and since buttermilk is very lowfat (weird, huh?), it keeps for several weeks.  That's plenty of time to make a second batch of these muffins, thus using up the extra buttermilk!  (Or, I have a great cornbread recipe that also uses buttermilk. Grandma's Cornbread)

Here's the actual recipe:

Cranberry Muffins

2-1/4 cups sifted flour
1/4 cup sugar
3/4 tsp. baking soda
1/4 tsp. salt
1 egg, slightly beaten
1 cup buttermilk
1/4 cup cooking oil
1 cup chopped fresh cranberries
1 tsp. orange zest
1/2 cup sugar

Stir together flour, 1/4 cup sugar, baking soda and salt in large bowl.  Combine egg, buttermilk, and oil in small bowl; stir all at once into flour mixture.  Do not overmix.  Combine cranberries, zest and 1/2 cup sugar; fold into the batter.  Scoop or spoon batter into muffin tins; bake at 400 degrees for about 20 minutes, until tops are golden brown.  Makes about 15 muffins.

I hope you enjoy these as much as my family does!

Sunday, December 1, 2013

Cross-Stitched Pincushion

If there's one thing I just love, it's a gift that is PRACTICAL.  And this one is a double score, because it's practical AND pretty!

I made the pincushion pictured above a few weeks ago as a gift for my sister for her birthday, using a pattern from Blackbird Designs, and 32-count Vintage Maple Sugar linen.  I used over-dyed floss, which has some color variations in it, and I really like the subtle shaded effect that the floss gave this project.

The pincushion took a little lest than 2 days to embroider, and then I got stuck a bit on putting it together.  I couldn't seem to find the type of crocheted edging that I was envisioning, and then I couldn't find the right stuff to fill the pincushion with.  But, eventually I found everything and finished this little pillow up on the sewing machine.

Size-wise, it's about 4 x 5 inches, so it's not a tiny thing.  I gave this to my sister together with a limited edition pair of patterned 4-inch Gingher scissors.  My sister doesn't do embroidery, but she has recently started sewing, so I thought she'd like a small, good-quality pair of scissors to keep by her machine to clip threads and so forth.  And it's nice to have a good pincushion, too.  It helps keep your pins nice and sharp, and I find it so much easier to grab pins from a pincushion than sticking your fingers into a box or cup of pins.

Oh, as a final little bit of loveliness, I stitched my sister's initials into the top right hand corner of the pincushion, and the year in the bottom right hand corner.  I always find that personalization makes a gift just that much more special.  


Sunday, November 24, 2013

Renewing an old friendship -- Counted Cross Stitch

When I was in law school many years ago, a friend of mine introduced me to counted cross stitch.  She was making a gift for someone, and came back from a needlework store with all kinds of stuff -- a chart, fabric, embroidery floss, and so forth.  When she showed me what all of it was, and what you did with it, I was entranced.  That happenstance introduced me to what became my primary hobby for quite a few years.

Well, then life intervened.  I had two kids, developed arthritis in my hands, and found that my eyesight wasn't what it used to be.  It got harder to see those tiny embroidery stitches, and my hands would often hurt after cross stitching.  So, somewhere along the line, I stopped doing cross stitch and took up scrapbooking, card-making, and rubber stamping.  I did think about cross stitch sometimes, mostly when I had occasion to go down to the basement and see my several boxes of cross stitch supplies, all neatly packed away.

My kids are now 19 and 13, and as best I can remember, I stopped doing cross stitch within a year or so after my younger son was born.  So it's been at least 12 years since I picked up a needle and floss.

Then a funny thing happened.  In September, someone on the scrapbooking message board where I hang out posted for advice, saying she had not done counted cross stitch in many years and wanted to get back into it.  Several people posted, saying they were in the same situation, and other active stitches put in their two cents.  I recommended some designers to the poster, and later that night, as I lay in bed, I started thinking about how much I used to love cross stitching.  Although I knew most of my supplies were in the basement, I also knew that I had a few things in the bottom drawer of what used to be my stitching table.  So, the next day, I rooted around and I found the three projects that I had in-process when I had decided that I couldn't cross stitch any more.  Over the next couple of days, I found everything -- my favorite hoop, the box of floss I had all organized with the colors I needed for those three projects, my needles and scissors..

I started thinking.  I still have arthritis in my hands, but I take a daily pain reliever now and the pain is much more manageable.  My vision is still bad, but somewhere along the line I discovered reading glasses and how great they are for failing , "over-40" vision.

So I decided to give cross stitching another try.  One sunny Friday afternoon that I had off work, I took out the project that you see in the picture above, I threaded a needle, opened up the chart for the design, put on my reading glasses, and... took a stitch.  

Friends, I don't know how to put it into words, but the best I can do is to say that as I made those tiny crosses that afternoon, I literally felt calmness and serenity wash over me like a soothing ointment.  I couldn't imagine why I had ever stopped cross stitching.  You see, I love everything about it -- the texture of the tiny crosses on the fabric, the feel of a beautiful piece of linen in my hand, the orderly precision of all of those rows of Xs, all lined up, the unfolding of a beautiful design.

So, long story short, I've been cross stitching like a madwoman ever since I renewed this wonderful friendship.  The design I'm working on at the moment, pictured above, is called "Spring Queen," and it's by one of my favorite designers, Nora Corbett of Mirabilia.  I'm close enough to the finish on this design that I'm working on it exclusively.

I'll post a picture when I'm finished!  In the meantime, is there a hobby that YOU once left behind, for an understandable reason or for no reason at all?  Maybe it's time to revisit something that gave you so much joy.  I am ecstatic that I rediscovered my love of cross stitch, and I don't see myself putting down my needle again for a long, long time.


Sunday, April 28, 2013

Carrot Raisin Muffins


Don't these muffins look yummy?  My absolute favorite muffins to make on weekend mornings are these banana muffins that my kids just love.  But, I don't always have two or three overripe bananas in the house, so I've been looking for another easy but delicious muffin recipe that uses ingredients I pretty much always have on hand.  So, I found the recipe for these Carrot Raisin Muffins in a quick-cooking type magazine, but for one reason or another, it took me awhile to try the recipe out.  I'm so glad I did, because these are wonderful, and the fact that they have carrots in them makes me feel the tiniest bit virtuous (I like to pretend that the carrot goodness doesn't get cancelled out by the sugar badness).

Carrot Raisin Muffins (makes about 16 muffins)
2 cups all-purpose flour
3/4 cup sugar
1 T. baking powder (yep, that's one TABLESPOON)
1/2 tsp. salt
1/2 tsp. cinnamon
1/2 tsp. nutmeg
1 large egg
1 cup milk (can be whole, lowfat, or skim, it doesn't matter)
1/2 cup butter, melted
3/4 cup grated carrots
1/3 cup golden raisins (I used currants, see note below)

Preheat oven to 400 degrees, and line a muffin pan with paper baking cups.  Combine flour, sugar, baking powder, salt and spices in a large bowl.  In another bowl, combine the egg, milk and melted butter, and beat well.  Add in the grated carrots and raisins, and stir.  Pour the wet ingredients into the bowl with the dry ingredients, and stir until just barely combined (a few lumps are fine -- don't overmix).  Scoop the batter into the muffin cups, filling each about 2/3 to 3/4 full..  I use an ice-cream type scoop for this task because it helps me keep each muffin the same size, but you can use a big spoon, as well.  Pop the muffin pans into the preheated oven and bake for about 20 minutes, until the tops are golden brown.  It's best if you turn the muffin pans once during the baking time, especially if your oven tends to have "hot spots."  When done, remove the muffins from the pan immediately and allow to cool a bit before eating.

Note:  This recipe calls for golden raisins (you could use regular dark raisins, too), but I like to use currants, and that's what I used for these pictures.  Currants taste very similar to raisins, but they are super tiny (and cute!).  Because they are small, they lend themselves well to muffins.  Each muffin with have a good number of the tiny currants.  You'll usually find currants in a small box near the raisins in your grocery store, but be warned, they are definitely more expensive than regular raisins.
This is what your dry ingredients and wet ingredients will look like before you combine them.  If you want, you can put the carrots and raisins in with the dry ingredients instead of the wet, but I like to do it this way because it helps ensure that the raisins or currants are nice and moist.
Here are the filled muffin tins, ready to be popped into the oven.  I got 15 muffins from this recipe, but you may get one or two less or more.  I don't recommend just filling the muffin cups to the top to use the extra batter, because muffins just don't work that way.
Here are the muffins, fresh from the oven.  I always lay them on their sides to cool for a bit, because it helps the bottoms not get soggy.  That's the same reason you need to take them out of the muffin pan right away -- if the baked muffins sit in the hot pan, the bottoms can get sort of "wet" and they don't taste as good.  Cooling the muffins for a few minutes makes peeling the papers off MUCH easier.
And here is a finished muffin, happily awaiting a spread of butter.  I hope you have a chance to try this recipe and tell me what you think!  By the way, these are good the next day, too.  The secret to keeping muffins a day or two is to cover them, but not tightly.  For instance, put them into a flat plastic storage container, but leave the lid ajar.  If you do this, the tops of the muffins won't get all wet and icky the next day.  Muffins are super moist so you need to vent the lid of your storage container a little bit to make sure that all of that moisture doesn't collect inside the container.
  

Sunday, February 5, 2012

Sew-Along Project: Sleep Pants (Finishing Up!!)

Woo-hoo!  We're just about at the finish line with our sleep pants!  In this last, finishing-up step, we'll be doing the hems on the legs of the pants.


To get the length right, have the person who will be wearing the sleep pants try them on.  Take a couple of straight pins, fold the hem up, and mark the length that you want the pants to end up.  If you're not sure how long they should be, a good rule of thumb for things like pj pants is that they should come just a bit above the floor at the back leg.  If you mark them at this length, the wearer will have plenty of length over the foot.  Remember, these pants won't shrink since we pre-washed our fabric.  You don't have to mark the whole hem while the pants are on the wearer; just mark that back leg area.


Once you know where you want the final length of your sleep pants to be, you need to cut the bottoms of the legs off exactly 1" below your final length measurement.  That 1" of fabric will be the hem.  You can use your seam gauge to mark all around each leg (with pencil) where your cut line will be.  That unfinished, cut edge will be enclosed in the hem, so it doesn't matter if you use something highly visible, like a red pencil, to mark your line.  Perhaps you're wondering, though, why you need to cut the excess fabric off?  Well, you could leave the length as is and make a deeper hem.  But, unless you're making these for a child and you want to allow some extra length that you can let out in case they grow, I recommend cutting off the extra fabric.  A small hem is easier to do and it's a more professional-looking finish.

So, once your legs have been cut, turn the pants inside out, use your seam gauge and turn up the hem to 1".  Pin all the way around each leg, as shown below:
Now take the pinned hems to the ironing board and press, just like you did when you were making the casing for the elastic.  Press carefully all around each leg, and take the pins out.  Your pants will look like this at this point:
Next step is to tuck the raw edge of each hem underneath, meeting the fold in the fabric and pinning in place, like this:
Keep going, pinning and pressing, all the way around both legs.  Leave a pin in at each seam, just to assist with the sewing.  Your pants will look like this once the entire hem has been pressed into place:

Now you're going to sew the hems.  If you have a free-arm machine, where you can snap a piece off to make a smaller, "floating" sewing bed, this is the perfect use for it.  It is MUCH easier to sew a hem on a narrow pant leg when you can just slip the leg right over the free arm of your machine.  This is something you want to consult your sewing manual for, if you aren't sure how your machine converts to a free-arm.  However, if you don't have a free-arm machine, no worries, just go slowly and make sure that you don't catch another piece of the leg fabric in the machine while you're sewing the hem.


The photo below shows my pants, slipped over the free arm of my machine, as I'm starting to sew the hem.  You want to start your sewing a few inches in front of the inner leg seam (which will be the French seam that we did).  This is because you want the start and finish of the stitching for the hem to not be noticeable.  Note in the photo below that I'm sewing pretty close to the folded hem edge, although you don't need to be right AT the edge like we were when stitching the elastic casing.  The hems are more forgiving.
One thing I want to mention here is that you'll need to coax your presser foot over the seam areas.  This is one of the things I don't like about French seams -- when you're hemming over a French seam, you've got a LOT of bulk once that seam is folded over, then folded over again.  However, your machine can handle it fine.  Just stop as you get close to the seam, keep the needle down, lift the presser foot up and adjust the fabric underneath, then carefully sew over the seam, pushing and pulling just a bit on the fabric until it feeds through the machine.  Always go SLOWLY when you're doing tasks like this, and you'll have great results.


Go ahead and sew the hems in both pant legs, and trim all of your loose threads.  Here's what the finished hems will look like on the outside ...
... and here's how they'll look on the inside:
Here's a close-up of how the stitching will look on the outside -- you can see that my stitching line is just about 1/2" above the bottom of the pant leg.
And that's it!  Once the hems are finished, your sleep pants are DONE!  Here is my older son, modeling his new, finished sleep pants:
What I would love for you to do is take a photo of YOUR finished sleep pants, and post it to the thread that I'll start on TwoPeas NSBR board.  It will be really fun to see what everyone has accomplished, and we can all pat each other on the back!


But seriously, aren't you proud of yourself?  You made a comfortable, durable pair of pj pants that will wear like crazy, won't shrink, and can be washed and dried with no seams raveling or threads coming undone.  You also (hopefully) learned a few new techniques in the process.


The NEXT sew-along project is going to be an apron, so start looking for some pretty, spring-like fabric to make yours, and I'll have an introductory post on that project soon!!